***
June 1st, 2019, the first day of summer …
While crocheting this garment I thought, Wait… It’s so boring to crochet alone and write all these dc, sc, ch for the thousand time, so why not to invite other crocheters? ? It will be so encouraging to try something new, and we will be more creative together! Besides, nobody will ask you to buy specific yarn – take the cotton or linen from your stash and start crocheting instantly. I’m sure that you will come up with a better garment than the one I have in mind. The masterpiece that you will be really proud of! ?
Shape
Something summery: seamless and sleeveless, worked from the top down, maybe with fringe. These ideas came to my mind:


choosing the best shape for our crochet garment
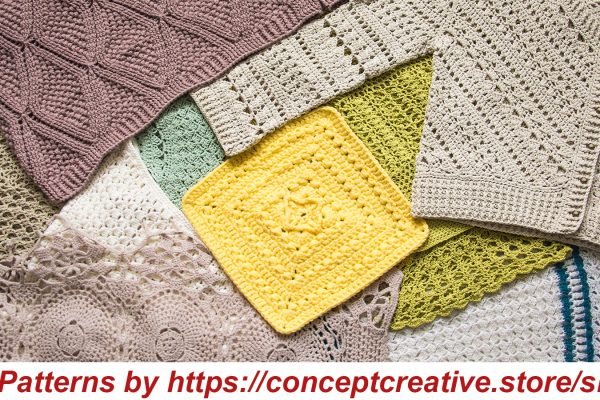
Stitches
I’ve chosen these stitches for our CAL because they create a very neat look that we want to see in our garments:
- all decreases and increases will look smooth, without huge holes or uneven bumps here and there (professional work is known for attention to details);
- these different stitch-patterns will help us to disguise our not-even tension (it’s difficult to keep an even tension all the time, especially, when we take multiple breaks);
- we will have just the right amount of texture to keep us interested in the process.
My favorite stitches are these clusters with long loops (we will crochet them in part 2):

Further on we will use puff sections to disguise our increases for bust and hips:

Finally, we will introduce puffed shells surrounded by the linen-stitch:

Linen stitch will be used in all places where we want to have more coverage (around bust, for example) and to separate all other stitches. It’s a perfect repetitive stitch pattern, quite simple and stretchy (you will alternate 1 chain with 1 single crochet stitch). Some people call it the Moss stitch, the Woven stitch, the Seed stitch, the Granite stitch… whatever stitch… There are no standard rules for giving them names that will be accepted by everyone. Let’s call it the Linen stitch pattern for the simplicity.
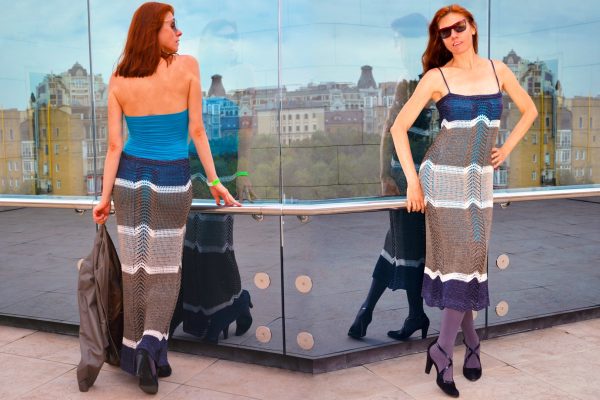
Type of garment:
 We will be crocheting our sleeveless garment from the top down until the underarms, then we will join Back and Front panels at armholes and crochet in the round. There is no seaming or tricky assembly, besides, you are going to use one Linen stitch pattern for the most time.
Here you see how my project looks like now. I’ve used 330 yards of linen for the size M (you’ll find more info about yarn weight below). And I’m planning to use all 1000 yards of this yarn – I don’t know where it ends, but it will definitely cover my hips. Of course, you can end this project at the desired length.
Make it for yourself or for somebody who can try it on from time to time. Although we could regard these “standard” measurements www.craftyarncouncil.com/standards/woman-size , they could be very different from yours. For example, according to this table I have:

Chest, Waist, Hips of size M = 36”-29”-38.5”,
Back Waist Length of size XS = 16½
Upper Arm of size XS = 9¾”,
Armhole Depth of size XS–S =6½”
Arm Length-to-Underarm of size XL = 17½”
Shoulder-to-Shoulder of size L = 17”
Center Back Neck–to–Wrist of size 2XL-3XL = 31.5”
Here you see this 44-years old creature of size M (me) with bro-o-o-oad straight shoulders of size L, thi-i-i-i-in arms of size XS and the arm length of size 2XL-3XL. I know, it’s strange, but I can’t do anything about my arms and shoulders. ???

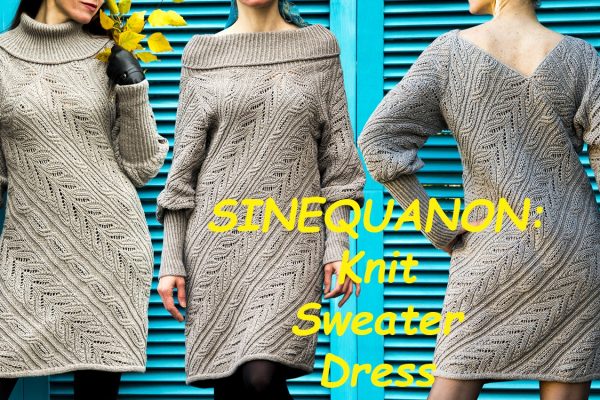
I said sleeveless, yes, but I drew this sweater that would cover my ahhh… beautiful arms ? and I loved it too, so, who knows? And it makes a mystery project for me as well ?
Oh, not to forget!
All crocheters, who have finished their top or dress by June 30th, 2019 will receive my PDF-pattern for the sleeveless top and dress.
(I’m not sure about the long-sleeve top, so I won’t promise it, OK?)
… so, how shall we proceed?
Time:
You can join me in JUNE 2019 (one month only). The whole process can take 20-70 hours – the duration will depend on your size, length, experience, crochet speed, chosen yarn and hook.
Use may use yarn of any weight because I will explain how to adjust the stitches to YOUR yarn thickness and customize to YOUR size. We will be crocheting this sleeveless and seamless crochet item from the top down, in one piece, so you can stop at any length. I’m going to use 1000 yards of 100% linen for the tunic or dress (size M). Total yardage will depend on your yarn weight, size and chosen length – the longer is your top or dress, the more yarn you will need. So, I’d better write the total weight of your future garment:
top = 300-500 grams (10.5-17.6 oz),
tunic = 400-600 grams (14-21 oz),
dress = 600-900 grams (21-32 oz).
This yarn usage is approximate and you might need more or less yarn, depending on where you are planning to stop crocheting it :).
Fiber and Color:

I suggest to use your stash cotton or linen – they are excellent for making lightweight, breathable garments that are comfortable to wear next to the skin, especially during the hot summer months. They are composed almost entirely of cellulose, an organic compound that when worn will actively conduct heat away from your body, thus this garment can be worn in hot weather quite comfortably. Unlike wool, acrylic and other synthetics, cotton and linen pull heat away from the skin.
Single-colored cotton or linen give fantastic stitch definition to puffs and clusters, letting every detail of these crochet stitches stand out beautifully. I showed darker and lighter colors, so you can compare the stitches before making a decision about particular color. Linen stitch can be made in any ombre yarn to keep these sections less monotonous and your work more exciting.
Hook choice:
Cotton and linen yarns are known for being inelastic fibers, with a tendency to relax in the direction that gravity pulls them. As garments are worn they begin to straighten out and stretch under their own weight. It is a good idea to have a firm grasp when working with cotton or linen as the weight of these fibers will pull the stitches down and make them sag a bit. Some crocheters prefer to work with hooks smaller than the recommended size for the cotton and linen yarns they are using. This might reduce some of the garment’s tendency to stretch.
Yarn and hook in the sample shown:
I crochet with blue and grey linen, using two strands and a 4-mm hook. My 10 cm = 4” swatch shows 19 double crochet stitches in 8 rows. Thus, the resulting thickness of yarn corresponds with 10 ply in the UK; Worsted weight in the USA. You may see the amount of stitches in 10 cm = 4” gauge on Ravelry. These cotton/linen yarns promise you more or less similar gauge width (for your reference):
www.ravelry.com/yarns/library/lang-yarns-lino 19 stitches in 10 cm = 4”
www.ravelry.com/yarns/library/punta-yarns-montoya-beach-solids 19 stitches in 10 cm = 4”
www.ravelry.com/yarns/library/stacy-charles-fine-yarns-nina 18 stitches in 10 cm = 4”
www.ravelry.com/yarns/library/the-plucky-knitter-lodge-worsted 20 stitches in 10 cm = 4”
www.ravelry.com/yarns/library/sandnes-garn-line 20 stitches in 10 cm = 4”
www.ravelry.com/yarns/library/moda-vera-linen-mode 17-22 stitches in 10 cm = 4”
www.ravelry.com/yarns/library/garnstudio-drops-belle 20-22 stitches in 10 cm = 4”
www.ravelry.com/yarns/library/erika-knight-studio-linen 21-22 stitches in 10 cm = 4”
www.ravelry.com/yarns/library/rowan-creative-linen 21 stitches in 10 cm = 4”
www.ravelry.com/yarns/library/maggiknits-maggis-linen 18 stitches in 10 cm = 4”
www.ravelry.com/yarns/library/dmc-creative-world-natura-linen 22 stitches in 10 cm = 4”
www.ravelry.com/yarns/library/ullcentrum-linea-linen 22 stitches in 10 cm = 4”
www.ravelry.com/yarns/library/knit-picks-cotlin 22 stitches in 10 cm = 4”
My gauge:

But you can take ANY available cotton or linen since you will be able to adjust the stitches to ANY yarn thickness and tension. I suggest to use the hook size recommended by the yarn producer. You do not need to swatch for this CAL, unless you want to check the length of your stitches. Wash your swatch, stretch up and down (to test how the stitches will be stretched in your garment), lay flat to dry out, then measure it.
Abbreviations used in this pattern (in American crochet terms):
yo – yarn over,
ch – chain (s),
turning ch – chain (s) in the beginning of the row (www.lionbrand.com/how-to-crochet-turning-chain),
sc – single crochet,
hdc – half double crochet,
dc – double crochet,
htr – half treble crochet (stitch halfway between double and treble crochet: yo twice (as for treble), insert hook into the necessary stitch, draw up a loop (= 4 loops on the hook), yo, draw through 2 loops (= 3 loops on the hook), yo, draw through the remaining loops (= 1 loop on the hook)
tr – treble crochet,
st (s) – stitch (es),
motif – repeated sts of the pattern,
R. – round or row, prev. R – previous R,
* – repeat the stitches from * to *,
Linen-Stitch-Pattern – LSP,
cluster – several sts joined together at the top www.redheart.com/learn/articles/how-crochet-clusters (every cluster of this pattern will be explained on the need-to-know basis). I love how Redheart described all these stitches worked together, so I will write skip 1 cluster instead of skip dc2tog – I always prefer using simple words to long abbreviations.
So, let’s start designing your summer garment!
Notes:
All rows worked with Linen-Stitch-Pattern are marked as LSP. There you will alternate 1 sc with 1 ch, try not to work chains too tight! Due to the nature of this stitch all excessive width of these rows will turn into length of your garment. We will check the width of your LSP before we join Front and Back and crochet in the round.
Part 1, upper part of the Back:
For your sleeveless top, tunic, dress chain 60 / 70 / 80 / 90 / 100 / 110 / 120 / etc. – your amount of chains should be a multiple of 10. Try not to tighten the foundation ch or use a slightly bigger hook for it (bigger than the one you want to use for the entire garment).
Finish your foundation chain when it is slightly wider than your shoulders: hold the ends of your foundation chain and place it behind your neck, laying onto shoulders. You may check the shoulder to shoulder width here www.craftyarncouncil.com/standards/woman-size Make sure that your foundation chain is from 5 to 10 cm wider (from 2 to 4 inches wider) and is a multiple of 10 (all our rows are based on a multiple of 10).
This will be a relatively simple section with rows of LSP:
R.1: 1 ch, 1 sc in 3rd ch from the hook, *1 ch, skip 1 ch, work 1 sc in next ch*, repeat from * to * across the R. (the amount of sc-sts equals to one half of sts in your foundation ch = 30 / 35 / 40 / 45 / 50 / 55 / 60 / etc.).
R.2 (LSP): 2 turning ch, skip 1st sc, *work 1 sc in 1 ch, 1 ch, skip 1 sc*, repeat from * to * across the R, finish with sc in last ch (count the same amount of sc-sts as in prev. R).
Divide your R. in 3 parts:
- right shoulder;
- 25-26 cm (10’’) central section for the neckline;
- left shoulder.
In left and right shoulders crochet the same LSP with sc-sts, in central neck-section work higher hdc-sts to make the neck higher.
R.3: 2 turning ch, skip 1st sc, *work 1 sc in 1 ch, 1 ch, skip 1 sc*, repeat from * to * the marked central section, there **work 1 hdc in 1 ch, 1 ch, skip 1 st**, repeat from ** to ** the marked st, in the shoulder section work from * to * the end of R, finish with 1 sc in last ch (total amount of hdc-sts and sc-sts equals to one half of sts in the foundation ch = 30 / 35 / 40 / 45 / 50 / 55 / 60 / etc.).
Repeat R.3 two more times or until the length of rows measured along the edges reaches 3 cm (1.2’’). Remember the amount of sc-sts in each shoulder, and make sure to crochet the same amount of them in repeated rows.
And here is the end of part 1.
Clusters with long loops will be started in next part. I hope you’ll love them too!
Procedure:
I have divided this pattern into several parts, just as in our previous CAL. Once you have read the introductory part about yarn, stitches, etc., completed and uploaded Part 1, you will be given the link to next part. Each part will be released on the blog as soon as at least one crocheter is ready to crochet next part. As a subscriber you will receive all these parts, but they will be password protected.
My final crochet version will be calculated for all adult sizes, for my gauge. I’m planning to publish it in my shops after the end of this free CAL.
- Part 1 (your just completed first 5 rows): crochet upper part of the Back, link your project to this pattern www.ravelry.com/patterns/library/summer-mystery-cal and post photo of completed 5 rows on Ravelry.
HOW to Add Your Project to Ravelry
I’ll see your project uploaded there and send you the link to next part within 12 hours.
- Part 2 (CHART for the Back will be introduced here): crochet up to your armholes.
Duration: 4-16 hours. Please, upload your project to Ravelry or Instagram.
Please tag #conceptcreativestore and #conceptcreativecal whenever you share this project on Instagram.
- Part 3 (CHART for the Front will show the neckline): crochet upper part of the Front up to your armholes.
Duration: 4-16 hours. Please, upload your project to Ravelry or Instagram.
- Part 4 (CHART for working in the round will be added here): crochet in one piece up to your waist.
Duration: 7-25 hours. Please, upload your project to Ravelry or Instagram.
- Part 5: crochet this garment up to desired length, finish.
Please upload your completed project to Ravelry to inspire other crocheters. Thank you! ?
HOW to Add Your Project to Ravelry
FAQ (please contact me only if you could not find the answer on this page):
Will this CAL be prolonged if you have not finished it by June, 30th, 2019?
Answer: No, but the complete pattern for my tension (19 dc x 8 rows in 10 x 10 cm = 4’’ x 4’’) and calculated for adult sizes will be added to Ravelry, Etsy and my shop (the usual PDF-printable version).

Will there be diagrams/charts/graphs?
Answer: Yes, all charts will be included starting from part 2.
Will there be a PDF-printable version?
Answer: Yes, the PDF for my version will be available after the end of this CAL. This free CAL will be published on my website only.
Will you be able to read next section if you have not finished the previous part?
Answer: No, because this way I will see your progress. Once you have uploaded photo(s) of one part you will receive a Ravelry message with respective password to access next part. No messages with passwords will be sent after June, 30th.
Will we see any supporting photos during this CAL?
Answer: Crochet basics are not illustrated, so you need to understand what it means to work 1 dc in 1 ch or 1 sc in 1 ch. Puff stitches, as well as several tricky parts will be illustrated with photos.
Level?
Answer: You should know how to crochet the basic crochet stitches: slip stitch, chain, single crochet, half double crochet, double crochet, double crochet stitches together, treble crochet (in American crochet terms). In this pattern we will introduce several puff stitches and long loops for adding more texture to your garment. These non-basic stitches will be explained in photos.
This garment takes a bit of patience to tackle the new stitches, so ideally, you have finished other garments by now. You can accelerate the process by choosing thicker yarn, or vise versa: make this garment more refined by working with thinner yarn and a smaller hook. Once you have reached the bust level you can omit some of the stitch patterns and repeat the ones you like best. Don’t let the stitch patterns overwhelm you – move to next stitch once you have mastered the previous one.
Can I purchase these tutorials on Etsy or Ravelry now?
Answer: No, it will be our mystery-CAL, right? So, the complete pattern will be published after we finish it.
Copyright
Photos, Charts and Row-by-row instructions that you will see during this CAL are property of conceptcreative.club, conceptcreative.store, conceptcreativeblog.wordpress.com, conceptcreativestore on Ravelry, conceptcreativestore on Etsy. Printable PDF will include all materials you see on my website, along with the colorful charts. Any reprinting, transmitting, reproducing, publishing or otherwise using for commercial purposes parts of this tutorial is strictly prohibited without my prior written permission.
You may sell as many ready made crochet garments as you want, provided that you post your own photos and give link to respective pattern by Conceptcreative.store on Ravelry.