I started knitting in 1982 and created cute dresses for my dolls. But it was another 8 years before I plucked up the courage to knit my first wearable cable sweater using charts published in German magazines and yarn my mother had on hand. My first double crochet stitches I tried out in 2008; in that first year I crocheted my first sweater and two cardigans using no detailed patterns, just adapting crochet charts for my figure.
Most women have common sence and know where to start shaping the armholes since we visited basic sewing classes in our schools and maybe created some dolls clothes. But my experience with crocheters from different countries shows that many girls disregard the basics about yarns and hooks while making grown-up clothes.
Want to know what are the most common mistakes (excluding some skipped stitches or rows)?
Choosing wrong fiber for their projects
The biggest and not forgiving mistake is not considering the yarn characteristics. Sometimes designers use expensive yarn that gives the drape and look we admire. Many yarn producers sponsor designers to create yarn-consuming projects with their yarn – to be sure they will have plenty of buyers for it.
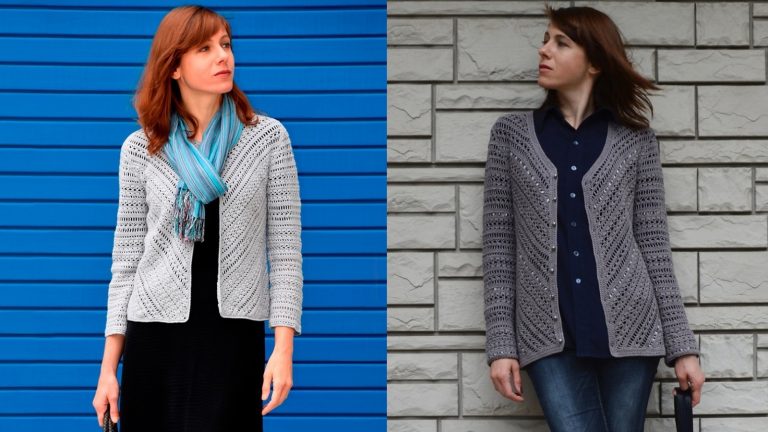
Each pattern is written with a specific yarn-weight and yarn-fiber in mind and even a single change can vary your outcome. For example, both jackets shown above have the same stitches in front. But the longer jacket was made with DK-weight rayon-linen-silk yarn and the shorter one was crocheted with Sport-weight 100 % merino wool. Since the Sport weight is thinner the resulting jacket is shorter and narrower. Of course one could use a bigger hook to compensate the length, but the wool fabric will be too sloppy for this jacket. You need to have the right hook so the stitches look well defined and beautiful – not too stiff, floppy or wonky.

If two yarns have very different characteristics – texture, drape (stretchy or not), fiber (cotton versus wool) the final garment will look and feel differently. Thus, the type of fiber is very important – if designers have used 100 % silk you can not achieve the same texture with 100 % bamboo, even if bamboo is as drapey as silk. If a pattern calls for expensive alpaca or merino and you are determined to use affordable acrylic the look of your garment will be absolutely different. Crochet dress made with drapey silk will hang well on the body, but the same dress made with 100 % cotton will lack drape and be rather stiff because crochet stitches are thick and dense. I assume that has happened recently when a crocheter was not able to obtain gauge for my New Year’s dress made with 100 % silk. 2 hours after the pattern purchase she wrote Frogged as sizing all wrong in her project.
Just because two yarns have the same gauge doesn’t mean that they can substitute for each other successfully in a given pattern. In one of my recent projects I’ve used Fingering-weight cotton and my garment was lacy. One of crocheters used thicker acrylic, but she could achieve the correct gauge. The resulting garment was bulkier. If they would be of the same fiber (cotton), the same texture and drape, the same length per ball-weight crocheters would have all chances to complete garments that look like pictured.
You can see how the same crochet stitches used in Wavyaccents crochet cardigan, skirt, dress and bag look in different fibers (wool-acrylic, cotton, silk) in video below:
1. The stiff mercerized cotton shown in this video keeps the shape of this crochet bag perfectly! I’ll take it to the beach in summer :).
2. The acrylic/wool blend in this crochet cardigan gives warmth in winter.
3. The drapy silk is perfect for the crochet maxi skirt & knee-length dress that’s you can wear in spring.
More finished crochet garments with these stitches are on www.instagram.com/explore/tags/wavyaccents
Not completing the gauge swatch before embarking on a project
Gauge (or tension) is given as a number of stitches (or repeats) and rows over a square 10 x 10 cm or 4” x 4”. The photo below shows such a square – 29 double crochet stitches worked in 11 rows:


Work more stitches and rows than stated in gauge. The edges in your swatch might get tighter or looser, so they will have different measurements and therefore should be excluded from calculation.
Wash, shape and dry
You are going to wear garments after the washing. To be sure that the stitches in your garment remain of the same length and width you need to wash your swatch, shape and lay it flat to dry (leave your swatch near radiators overnight for example). Measure the 10 x 10 cm = 4” x 4” in the middle when your square is completely dried (you won’t save time by measuring a swatch that is still wet). You can’t accelerate the process by steam-blocking either, as it doesn’t give the same change in gauge as washing.
Putting off starting a new project to make the swatch might seem bad enough, let alone waiting for it to dry after washing! But in most cases people who are bored with swatching and who can not recalculate the stitches for their yarn/hook often frog their whole garments because they do not fit. Naturally these garments can be considered as their huge testing swatches.

There is no guarantee that the height of your stitches will be the same with the hook stated in the pattern (more about hook sizes is written below). While in bags, scarfs, shawls achieving correct gauge is not crucial any differences in tight-fit garments could be a disaster.
If your pattern expects you to get particular amount of stitches and rows per 10 cm = 4” and your yarn gives you something different, your garment will be of a different size than the one given in the pattern and all your efforts will go in vain. Thus, always work up a swatch if you make garments of specific size.
Not considering the thickness of yarn
Have you noticed that yarn weight tables contain information about the width of the stitches worked with these types of yarn and never the length of the stitches?

(sourse: Ravelry Standard Yarn Weights )
Why it is so? Because the yarn thickness determines only the width of your stitches (and width of gauge). The length of the stitches worked with the same yarn will determine the hook (or needles) and your own way of crocheting (or knitting). If you have chosen correct yarn, the width of the stitches will be spot on. If your swatch is wider – use a thinner yarn, if it’s narrower than stated in the pattern, then your yarn should be thicker.

What do you need to check before starting swatching?
Length per unit
The length per each unit is usually stated in your yarn. The closer is the length of your yarn per 100 gr (per 3.5 oz) to the recommended length, the easier will be obtaining the correct width of gauge.
Why looking at the length per 100 gr (per 3.5 oz) is important? Even if yarn is labeled as Fingering (14 wpi) 4 ply one yarn has 300 yards (280 m) like two balls of Rowan Ryc Siena, another one has 360 yards (350 m) like Rowan Summerlite 4 ply and third yarn has 480 yards (438 m) like Wolles yarn Creations Cotton-4-ply (just 3 examples of yarn, labeled as Fingering-14 wpi-4 ply. With the same hook all 3 yarns will produce different width of 29 double crochet stitches, even if it’s stated that they have 28 sts per 4” (it might be that the amount of stitches per 4” was recopied). First two cottons look bulkier than my cotton/rayon Fingering (14 wpi) 4 ply, even if I had 29 double crochet stitches per 4” in the photo above.
This web site https://yarnsub.com/yarns calls 99 % matching those yarns that are extremely close to the given length per 100 gr (per 3.5 oz) and of the same fiber. For example, if you look for some substitutes for cotton Rowan Summerlite 4-ply 350 meters/100 gr 99 %-equivalent cottons are those that have 340-360 m per 100 gr (length of two 50gr balls). With suggested 99 %-matching substitutes you can achieve the correct width of the gauge if the recommended yarn was Rowan Summerlite 4-ply.
In the USA shops sell yarn up to some price level, sometimes yarn is offered in 3 oz, sometimes in 16 oz etc. Recalculating it to 100 gr (3.5 oz) is not hard: just multiply the total length in your skein/ball by 100 gr and divide by the total weight of your skein/ball.

For One Pound by Caron 742 meters (total length) multiplied by 100 and divided by 453 grams (unit weight) is 164 meters.
For Big Cakes by Caron 551 meters (total length) multiplied by 100 and divided by 300 grams (unit weight) is 184 meters. Which is approx. 11 % thinner than One Pound.
For Wool-Ease Solids, Heathers & Twists by Lion Brand 180 meters (total length) multiplied by 100 and divided by 85 grams (unit weight) is 212 meters. Which is approx. 13 % thinner than Big Cakes.
All 3 yarns belong to the same group Aran (8 wpi) Medium weight (4). But they would not be 99 % matching to each other.
Crochet thread is often labeled as sizes 3, 5, 10, 20, 30. That might create a confusion if you are used to yarn where the higher is the number, the thicker is the yarn. The numbers on the crochet thread are just the opposite – the thinner is the crochet thread the higher is its number (crochet threads 3 and 5 are close to fingering or light-fingering weight). Since most producers state the length per unit weight just pay attention to the length of yarn (in meters or yards) per ball/skein stated in your pattern.

How tightly spun yarns are
Yarn consists of one or more strands of yarn called plies. Plied yarns are made from several plies of yarn twisted together. The thickness of a given yarn is determined not by the number of plies, but by their individual thickness. If the plies are thin, a 4-ply yarn can be finer than a heavy single-ply yarn. American 4 ply yarn is thicker than 4 ply in UK (see the example above with three American yarns labeled as “4 ply, Medium weight”). The American equivalent for the British 4 ply is 1: Super Fine. Confusion with American and British ply is avoided if you check the recommended length per unit. British 4 ply yarn is much thinner.
It also depends on whether the strands in yarn were well twisted or not twisted at all. Craftsy wrote about the importance of the yarn twist here. In general, plied and well-twisted yarns produce thinner looking classic stitches while not twisted yarns (or loosely woven) give “fuller” and relaxed stitches, thus your garment will drape more. Most bohemian-looking (aka hippie-style) crochet garments require loosely woven yarn because of their rustic look.
Some yarns have… cable … ribbon structure that also will have more volume, without making them look rustic.
When you have obtained the correct width it means the yarn was chosen correctly, now it’s time to adjust the hook size (and achieve the correct length of gauge).
Working with the wrong hook
Some people work loosely, some tightly, some in-between – and even with the same yarn and hook achieve different results – we all crochet with different tension and hold the hook differently. It is determined by the shape of our hands, the length of our fingers, whether we have learned to knit before. For example, I hold my crochet hook as one of knitting needles and control the length of the stitches with my index finger. I use the simplest metal thin hooks and my fingers and hands never get tired.

The best hold is the one that works for you! And do not worry about whether you have the exact hook size the designer used. Always ask yourself – is the stitch definition what you would like for this project?
In the USA crochet hooks are marked with an mm-size. The smaller is the number stated in mm, the smaller is the hook. Thus 2 mm, 1.5 mm, 1 mm and further down will be smaller than all hooks shown here:

If you like your crochet fabric and the width of gauge is correct but the height of the stitches is wrong take a bigger hook to work longer stitches (= the length of rows was smaller than stated in the pattern) and vice versa – use a smaller hook to decrease the length of your gauge (= the length of rows was bigger than stated). Often changing the hook will help to get the gauge of the pattern.
If you prefer to use your hook and yarn and nowhere close on gauge you will need to recalculate the stitches to make sure the garment fits you.
Not reading through the whole crochet pattern
I do not mean reading and imagining every row in your head. No, it’s rather paying attention to the schematics, measurements, notice all stages like what to work first and what to sew next. It might help to divide your project into stages worked during several evenings or put away your project for relaxed weekends. Often reading a sentence twice would make more sence, so you will notice ignored stitches or steps (like changing the yarn color).
You’ll be more confident to know that you have everything in mind when you start!
Happy crocheting/knitting!
UPDATE, Ferb.23rd, 2023.
Here is what Simply Crochet wrote on the same subject on 05.12.2021:


Hi Inna,
Thank you that was a very useful article. Thank you for sharing your knowledge.
Have a nice weekend.
Mel
Hi Mel,
I’m really glad it helps!
Have a great weekend too!
Inna
Agree! I’m always pushing my limits with yarn and hook size on patterns.
thank you!
Thanks, very useful!
Like!